Country Living in a Cariboo Valley

Homesteading in BC

  • How to Get Started
  • Vegetable Gardening
  • Preserving Food
  • Recipes
  • Homemade Wine Recipes
  • About Us
  • Work With Me
  • Shop
    • Vegetable Garden Planner Printable: Grow Your Best Garden Ever
    • Grow Enough Food for a Year
    • Delicious Dandelions: A Recipe Collection
    • Dirt to Dollars: Selling at the Farmers Market
    • 8 Pounds in 8 Weeks: Raising Chicks for the Dinner Table
    • Making Wild Wine
    • Build a Hanging Chicken Feeder
    • 15 Things to Know About Living in the Country

Dutch Butter Cake Recipe – Boterkoek

By Annie

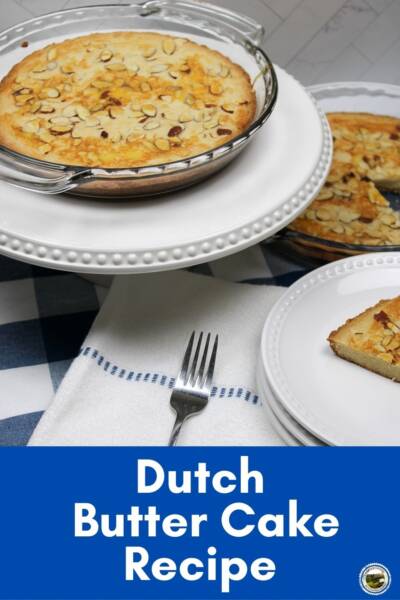
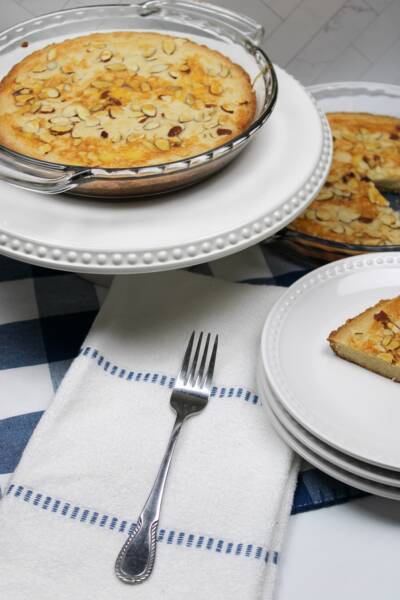
This Boterkoek (or butter cake) is a delicious and hearty Dutch recipe.

This Dutch Butter Cake is full of delicious butter and topped with crunchy almond slivers, this unique and tasty dessert is perfect for any time you need a sweet pick-me-up! If you like the flavor of almonds, you will love this Boterkoek recipe. 

A slice of this cake, along with a cup of coffee is delicious!

Traditional Dutch Almond Butter Cake cooling just out of the oven.
This delicious Boterkoek recipe makes a buttery cake with lots of almond flavor. You’ll love this for holiday gatherings!


Why You’ll Love This Dutch Butter Cake

Here’s a smashingly simple treat – my Boterkoek Recipe, or almond butter cake. It’s a Dutch tradition in my family, made by almost every Oma (grandma).

My sons have been enjoying this cake for as long as they can remember. We make this every Christmas and any other time of the year we have a hankering for the taste of almonds.

At holiday time, we actually make about 8 or 10 of these cakes. Friends love receiving a Boterkoek at Christmas time and they make a great hostess gift too!

Ingredients Needed for This Dutch Boterkoek Recipe

Ingredients for Boterkoek on a table.
The ingredients to make this almond Dutch Butter Cake.
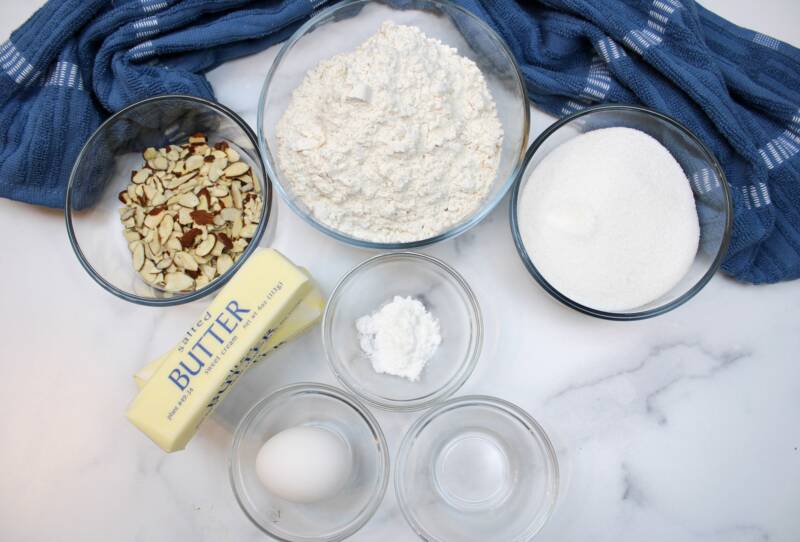
  • butter – the star of this cake!
  • sugar – makes your almond butter cake nice and sweet.
  • white all purpose flour – another kind of flour can be substituted, but white flour works best here.
  • egg – you’ll need 1 for the cake itself and another to beat and eggwash the top of your cake.
  • baking powder – helps give your cake some volume.
  • almond extract – melds perfectly with the butter and gives your cake a subtly sweet, nutty flavor.
  • slivered almonds – for extra decoration, flavor, and texture.


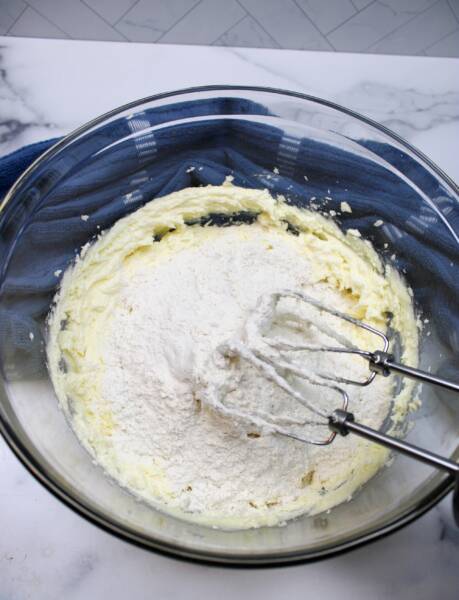
How to Make Boterkoek Dough

You can either use your cake mixer or just mix together by hand. I just stir in my ingredients by hand and don’t bother pulling out my stand mixer.

Adding flour to butter and sugar mixture.
If the batter seems thick, don’t worry! Just keep combining the dry ingredients and trust the process.

Preheat the oven to 350F.

  1. In a large bowl, whisk butter and sugar together well. Add one egg and mix again. Adding one of our hen’s eggs makes this batter so yellow and pretty! Love those dark yolks from our chickens.
  2. In a separate bowl, sift together flour and baking powder.
  3. Add the flour and baking powder to the wet ingredients.
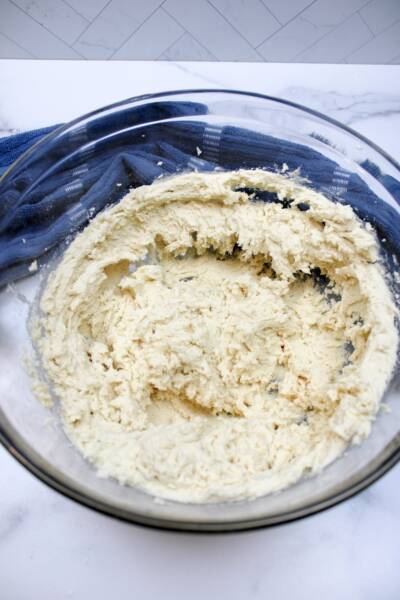
  4. Start mixing it together – you will find you have quite a thick dough (for a cake), but that’s perfect. Just keep mixing the flour in.
  5. Then add the almond extract – I like adding it when I find the dough getting hard to mix together. Even just a teaspoon worth makes it easier to blend.


Thick batter of Dutch butter cake in a bowl.
Thick batter well mixed and ready for the pie pan.

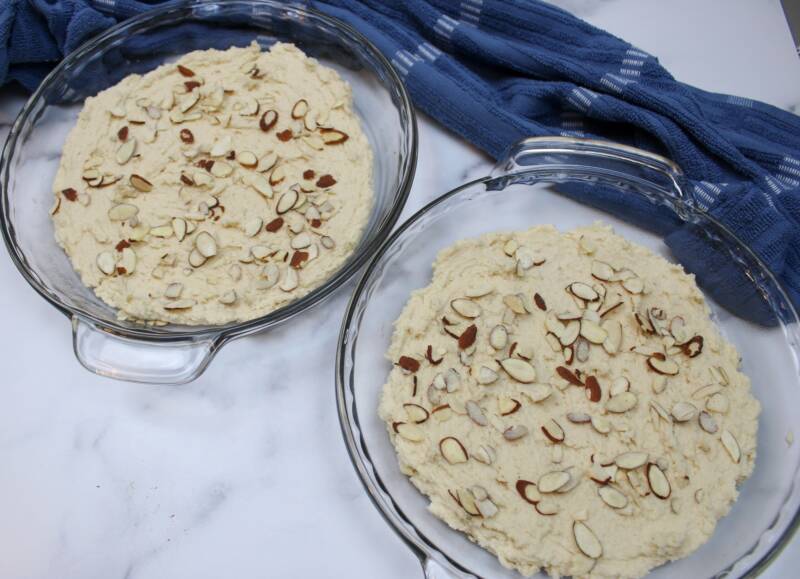
6. When your dough is well mixed, split it between two 9-inch prepared pans. I like using tin foil pie plates, as we like to give so many of these away to friends.


Spreading the Dough and Baking

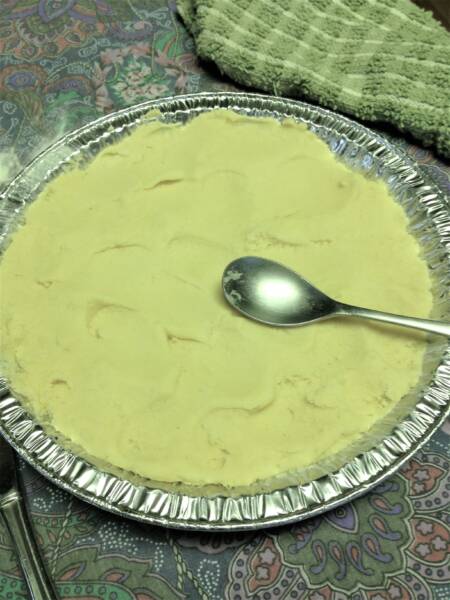
Here’s where you need to take some extra time with this recipe! Use a butter knife and begin pressing that dough down.

Spread the dough mixture out to the edges and take your time. Not too much pressure, just slide the knife across the top of the dough, pressing slightly.

Once you have the dough out to the edges and quite even, use the back of a spoon to smooth the top of the cake. Use a light touch! 

Smoothing the Boterkoek with the back of a spoon.
To really perfect this Boterkoek recipe, be sure to spend the time smoothing down the batter. It’ll look so perfect once it’s baked!

Got it all smooth? Take a beaten egg and a pastry brush and very lightly brush the tops of the cakes with just a bit of the egg wash.

You will not use all of the egg! Then sprinkle slivered almonds on top.

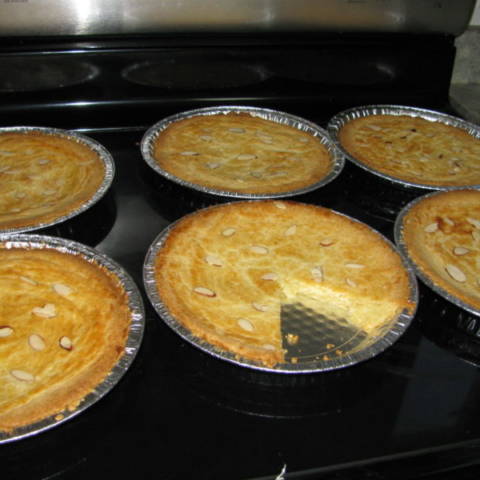
Bake in a preheated oven at 350 for a cook time of about 25 – 30 minutes. The total time will depend on your oven.

NOTE: Keep an eye on these while baking. You want to remove them from the oven when the edges start turning golden brown.

The ideal is when the center of the Dutch Butter Cake is still soft to the touch.

Almond slivers pressed into the top of Boterkoek batter.
Adding almond slivers brings out the almond flavor and gives your cake an added crunch.

Let the cakes cool completely, then cut into wedges like a pie. Serve at room temperature with a cup of coffee!

I have yet to meet someone who doesn’t like this Dutch treat! Try this Boterkoek recipe and maybe you’ll make it a tradition yourself. Enjoy!

Baking Pans for Dutch Butter Cake

A bit of information about the baking pans for this recipe, because it does make a difference!

You can use almost any baking tin for this cake but I like to use a 8 or 9 inch glass cake pan. Or, use a pie pan or a springform pan.

You could instead use a square baking tin and cut the finished cake into small pieces, essentially making squares or a cookie.

The baking time will very likely differ depending on the pan used. It’s really important to keep an eye on the Boterkoek in its last minutes baking.

Remove it from the oven when the edges are completely golden brown, even if it looks like the center is not done. 

Remove from the oven and set on top of the oven and then leave it be until it is cooled.


Variations:

Add a little lemon zest to the batter for a delicious zing! 

You can use vanilla extract instead of the almond extract, if you prefer.

Add a little sifted powdered sugar as a cake topping, once it has cooled down after baking.

If you do a crosshatch pattern on the top, it looks quite pretty!

Just use the tines of a fork, after smoothening the batter out in the cake pans.

More Sweet Recipes

Our entire Country Living in a Cariboo Valley Recipe Collection can be found here, and here are some more recipes hand-picked for you!

  • If you love Gingerbread, come over and grab my Gingerbread Boy recipe – a real treat at Christmas time!
  • Fireball Pumpkin Pie is a fantastic dessert to enjoy during the fall months.
  • And for something more summery, this Lemon Loaf Cake with Rosemary is a light and tangy option.


Dutch Butter Cake on a white plate on a blue checked tablecloth.
When finished, this Boterkoek recipe is deliciously buttery and so rich.


Boterkoek Recipe

If you enjoy this recipe for almond butter cake, please be sure to rate it 5 stars below! And print this recipe card off or save it to your recipes folder!

Boeterkoek (Butter Cake)

Boeterkoek (Butter Cake)

Prep Time: 30 minutes
Cook Time: 25 minutes
Total Time: 55 minutes

A traditional Dutch dessert sure to please. If you like Almonds and butter, you will love this rich treat.

Ingredients

  • 1 cup butter, NOT Margarine
  • 1 cup sugar
  • 2 cups white flour
  • 1 beaten egg
  • 1 tsp baking powder
  • 1 tsp almond extract

Instructions

  1. Cream the butter and sugar together, then add the egg. Mix well and then add the rest of the ingredients.
  2. Grease your pie pans (I use the foil disposable ones) and divide the mixture into the 2 pans.
  3. Using a clean butterknife, or the back of a spoon, start patting down the mixture.
  4. The next step takes some time - don't rush it.
  5. Use the back of the spoon to "smoothen" out the mixture. Make it look nice!
  6. Take a bit (and I mean Just a Bit) of a beaten egg and brush that (ever so lightly) on the tops of the cakes.
  7. Then take a few slivered almonds or almond slices and drop them on the top. Push them in slightly with your finger.
  8. Pop them into a 350 degree oven for 25 - 30 minutes, till they are nice and golden brown on top.
Nutrition Information:
Yield: 8 Serving Size: 1 Servings
Amount Per Serving: Calories: 437Total Fat: 25gSaturated Fat: 15gTrans Fat: 1gUnsaturated Fat: 8gCholesterol: 84mgSodium: 253mgCarbohydrates: 49gFiber: 1gSugar: 25gProtein: 4g

Did you make this recipe?

Please leave a comment on the blog or share a photo on Pinterest

© Annie

First Published December 2017; latest update December, 2024

Thanks for checking out this recipe. For more, follow me on Facebook, Pinterest, Instagram, and Twitter!


Dutch Butter Cake on a cake stand


Filed Under: Recipes

Pumpkin Cranberry Banana Bread – Recipe

By Annie

Pumpkin Cranberry Banana Bread is a sweet and comforting treat that’s so hearty and perfect for extra pumpkin and overripe bananas!

Earlier this week I made a pumpkin pie, but only used half of the large can of pumpkin filling I had bought. Since I already had some over ripe bananas and some dried cranberries, I thought I would give this loaf a try.

I love using my home made Pumpkin Pie Spice in this recipe!

Pumpkin Cranberry bread with a light glaze sits on a wood serving tray.
Save this Cranberry Pumpkin bread recipe to your Pinterest board.

Why You’ll Love This Pumpkin Cranberry Banana Loaf

Here’s a Pumpkin Cranberry Banana Loaf Recipe for you that’s healthy and filling. It’s easy to make, healthy and filling and is perfect for a fast snack or even breakfast on the go!

You can use your stand mixer or just mix this loaf up by hand.


Ingredients for Pumpkin Cranberry Banana Bread

  • mashed bananas – because this is banana bread, the riper the better!
  • eggs
  • olive oil
  • pumpkin puree – I used some that I had leftover from making a pie; this gives your loaf a hearty pumpkin flavor!
  • honey – a delicious natural sweetener.
  • sugar – helps the honey do its job.
  • flour – you can use whole wheat flour or all purpose flour
  • baking powder and baking soda
  • salt
  • pumpkin pie spice – brings out the taste of the pumpkin and adds a new kind of flavor to your banana loaf.
  • cinnamon – works great with the pie spice.
  • dried cranberries – add extra sweetness and a little bit of nutrition as well! You could use fresh cranberries instead.


Pumpkin Quick Bread Recipe Instructions

Preheat your oven to 350 degrees F, then grease and flour two loaf pans (or use cooking spray).

Mashed Bananas to make bread
Use very ripe bananas to make this yummy loaf.

Grab a medium bowl to prepare the banana the wet ingredients. Mash your overripe bananas well, using a fork. You can also use a potato masher if that works better for you.

Pumpkin, bananas and other wet ingredients being blended together.
Mix these well together.

Stir together the mashed bananas, eggs, oil, pumpkin, honey, and sugar in a large mixing bowl.

Mixing dry ingredients for Pumpkin Banana Bread
Mix together dry ingredients.

In another large bowl, combine the flour, baking powder, baking soda, salt, pumpkin pie spice, and cinnamon. I like to use a whisk for mixing this flour mixture, but a large wooden spoon works too.

Mixing dry ingredients well with wet ingredients.
Mix dry ingredients into the pumpkin banana mixture.

Stir the dry ingredients into the banana pumpkin mixture, mixing thoroughly and then fold in the dried fruit.

Pumpkin Banana Cranberry Bread ready to be cut in slices.
Let the baked Pumpkin Banana bread cool before slicing.

Pour batter into your prepared pans and bake for about 45 minutes. Test by inserting a toothpick into the center of the loaf. Pull it out.

The pumpkin bread is done when the toothpick comes out clean, with no batter on it. Remove from the oven; I like to wait 10 minutes, then remove the loaf from the pan and allow to cool on a wire rack. 

Allow to cool for at least 20 minutes until slicing and serving!

Serving Suggestions and Variations

  • Spread with some butter if you like and enjoy this banana loaf with some hot coffee!
  • Add more spice such as ginger or nutmeg.
  • Use a muffin tin or these mini loaves tins to make individual servings of this quick bread or pumpkin cranberry muffins.
  • For some extra crunch, add chopped up walnuts, pecans, or any kind of nut you like to the batter.
  • If you don’t like dried cranberries, any kind of dried fruit will work for this bread. Raisins or dried cherries or apricots cut into smaller pieces would be delicious!
  • This banana loaf would also be delicious with a light glaze over top. Check out this great recipe from The Spruce Eats for how to make a simple glaze out of powdered sugar.
  • To make this recipe vegan, omit the honey and replace the egg with either a half cup of applesauce or 2 tablespoons of ground chia seeds or flax seeds mixed with 6 tablespoons of water.
Pumpkin Banana Bread on a white plate on blue cloth
Click to save for later on your Pinterest board.

More Dessert Recipes

Our entire Country Living in a Cariboo Valley Recipe Collection can be found here, and check out some of these other delicious desserts!

  • Here’s a classic banana bread recipe if you don’t have pumpkin or dried fruit on hand!
  • Chewy Coconut Cookies are a sweet and light treat that are perfect for an afternoon snack or dessert.
  • Can’t get enough loaf cakes? Try this Lemon Loaf Cake with Rosemary Glaze!
  • This Fireball Pumpkin Pie is a great dessert to warm you up in the cold months.


Pumpkin Cranberry Bread

If you like this delicious banana bread recipe, be sure to rate it 5 stars below!

Thanks for checking out this recipe. For more, follow me on Facebook, Pinterest, Instagram, and Twitter!


Baked Pumpkin Cranberry Bread on a table with coffee

Pumpkin Cranberry Banana Bread Recipe

Yield: 12 servings
Prep Time: 15 minutes
Cook Time: 45 minutes
Total Time: 1 hour

This loaf combines three Fall favourites - Pumpkin, Cranberry and Bananas. Perfect with a cup of coffee for an afternoon snack.

Ingredients

  • 2 ripe mashed bananas
  • 2 eggs
  • 1/3 c olive oil
  • 1 1/3 c pureed pumpkin
  • 1/2 c honey
  • 1/2 cup sugar
  • 2 1/2 cups flour
  • 1 tsp baking powder
  • 1 tsp baking soda
  • 1/2 tsp salt
  • 2 tsps. pumpkin pie spice
  • 1 tsp cinnamon
  • 3/4 c raisins, I used cranberries
  • 1/2 c walnut pieces, optional

Instructions

  1. Preheat oven to 350 degrees and grease and flour two cake loaf pans.
  2. In large bowl, stir the mashed banana, eggs, oil, pumpkin, honey and sugar.
  3. Combine the flour, baking powder, baking soda, salt, pie spice and cinnamon.
  4. Stir it into the banana mixture, then fold in the raisins and walnuts.
  5. Pour into prepared loaf pans and bake for about 45 minutes or until a toothpick inserted in the centre of the loaf comes out clean. Cool loaves in the pans for about 10 minutes before removing.
Nutrition Information:
Yield: 12 Serving Size: 1 inch slice
Amount Per Serving: Calories: 336Total Fat: 10gSaturated Fat: 1gTrans Fat: 0gUnsaturated Fat: 8gCholesterol: 31mgSodium: 258mgCarbohydrates: 60gFiber: 3gSugar: 31gProtein: 5g

Did you make this recipe?

Please leave a comment on the blog or share a photo on Pinterest

© Annie
Cuisine: American
Pumpkin Cranberry loaf on a plate
Click to save to your favourite Pinterest board!


First Published November 2013; latest update Dec 2024


Filed Under: Food, Recipes

Ultimate HP Sauce Recipe -Homemade Condiment

By Annie

This HP Sauce recipe makes 15 half pint jars. Also known as A1 steak sauce or Brown sauce, this condiment is perfect for savory foods!

We love this homemade HP Sauce recipe! I make some every year, water bath can the full mason jars and then store them in my food pantry. Perfect on steaks and roasts, this brown sauce adds a delicious flavor to tomato dishes.

HP Sauce in a mason jar and a dish ready for brushing on meat.
HP Sauce recipe that is the perfect condiment for steaks, meats and savory foods.

Here’s how to make your own home made HP – invite a friend to spend an afternoon chopping and cooking, open a bottle of red wine, have a wonderful visit, make this ultimate condiment and split the rewards.

This recipe with plums, apples, onions and spices has earned its spot on my once a year canning list.

HP Sauce Recipe and Canning Instructions

I’ve got the detailed recipe here for you – plus, the water bath canning procedure to safely preserve the Brown Sauce in jars. This will allow you to store your jars in the pantry or kitchen cupboard. But first, a bit more info about this much loved condiment.

What is HP Sauce?

HP Sauce is a condiment that is used in many dishes. Popular in the United Kingdom (UK), Canada and other parts of the world, it is a favorite for brushing onto grilling meats. It is often used as part of a full English breakfast.

The original brown sauce recipe was created by Frederick Gibson Garton in Nottingham in the late 1800’s and was used in the kitchens of London’s Houses of Parliament. For years it was a closely guarded secret recipe for this distinctive sauce.

You can find it sold by the bottle – glass, not plastic. Product packaging includes a drawing of the Houses of Parliament on the label.

The commercial manufacturer is Heinz and it is made in Holland. You should be able to find it where you buy groceries, or at a speciality convenience store.

It can be either tart or sweet or both, depending on the ingredients. Commercial HP sauce has glucose-fructose syrup, rye flour, malt vinegar, spirit vinegar, barley, tamarind extract, molasses, artificial colours, artificial preservatives and artificial flavours.

(Our homemade recipe has none of these ingredients.)

A small bowl of HP sauce on a wood table.
Don’t lose this recipe! Just pin this to your Pinterest board.

What does HP Sauce taste like?

HP Sauce is so good! It is so flavorful; it’s spicy with fruity tones along with a zing of vinegar. It’s thick, but not as thick as ketchup. You can thicken it to whatever consistency you like, just let it cook longer. The longer it cooks, the thicker your sauce will become.

Does HP Sauce need to be refrigerated?

Because of the vinegar in the recipe, Hp sauce does not need to be refrigerated. However, we do keep ours in the fridge after we open the jar. Of course, if you follow the canning recipe below, your sealed jars are perfectly safe in your cupboard or kitchen pantry.

Wondering what HP Sauce is used for?

HP Sauce Uses

There are many ways to use it!

  • Brush onto grilling meats like sausage, steaks, bangers, chicken or heartier meat dishes like pork pies.
  • Use for marinating steaks.
  • Add to tomato based dishes such as Bolognese sauce.
  • Brush onto vegetables grilling on the barbeque. 
  • Add to white rice instead of soy sauce.
  • Adding to casserole ingredients before baking (especially good with cheese)
  • Add to your crockpot of baked beans.
  • Delicious to add to baked beans over toast.
  • Use as a spread for a tomato and bacon sandwich.
  • Use in stews, soups and gravy.
  • A dollop of HP goes great on baked potatoes and chips (french fries).

How to use HP sauce for steak?

Use HP sauce for steak the same way as you would with any other kind of meat. If you are grilling steak, cook one side and when you turn the steak over to cook the other side, simply brush the sauce over the meat.

Use a little or a lot – if you like this sauce, you just cannot use too much!

HP Sauce Substitutes:

There are several different kinds of steak sauces available at your grocer. But, they are not the same! 

These may be good, of course, but they are not the same – in taste, brand or flavor:

  • A-1 sauce
  • Branston sauce
  • Brown sauce
  • Heinz original steak sauce

HP vs A1 Sauce

Hey, it’s totally a matter of preference. We enjoy A1 sauce, but we like HP Sauce more. All I can say is we’ve converted a few A1 diehards over to our homemade HP!

HP sauce is a favourite with Canadians and of course, English folks!

HP Sauce Ingredients:

I always make my sauce in late July, as that is the only time of the year I can find prune plums locally. Sometimes, the grocery store doesn’t even have those. So I have made my sauce with red plums – it tastes a little bit different, but is still really so very good!

Another year, I couldn’t even find red plums locally so I resorted to making this condiment recipe with yellow plums. It tasted delicious and had more of a caramel color.

  • apples
  • prune plums
  • red onions
  • malt vinegar or cider vinegar (better than using white vinegar)
  • Worcestershire sauce (Lea & Perrins)
  • spices
  • salt and pepper
  • sugar

Made with the highest quality ingredients, this recipe is suitable for vegetarians and those with diet restrictions. This recipe makes about 15 half pint jars of HP Sauce.

HP Sauce in a dish ready to be brushed onto meat.


Let’s get started!

Cut the apples, plums and onions into fairly small pieces. When preparing the apples, I cut each apple into 4 pieces and core them but I don’t bother to peel them.

Because I will use a sieve, that will take out all the peels. With the plums, I just cut each plum into small pieces, leaving me with just the pit.


HP Sauce recipe starts with cooking apples, plums and onions until soft.

Place the fruit and chopped onions into a large stockpot and add just enough water to prevent any scorching, about 2 cups of water, no more. 

Bring to a boil, turn the heat down and let it cook on medium heat until the fruits and onions are softened. Stir fairly often as you don’t want any scorching on the bottom of the pot. Reduce the heat and let it simmer.

Once it’s cooked through and all the fruit is softened, you can use an immersion blender or a potato masher to start breaking down the fruit. Let it continue cooking for another half hour on a low heat.

Using the Sieve or Food Mill

Get your sieve ready and fill part way with the cooked fruit. Press the pulp through the sieve, emptying into a large cooking pot. Really work that pestle and push as much pulp as you can through the sieve.


Authentic HP Sauce after putting through food mill
HP Sauce on the left, all the peels in a bowl on the right!

Left behind in the sieve will be all the peels from the fruit. Discard that, add it to your compost or even better, feed it to your chickens, they will love it!

Thickening Homemade HP Sauce

Set your pot on a medium heat, and add the vinegar. Then add all the seasonings and sugar. Boil this until it becomes thick. You will need to stir it regularly and it will take several hours to reduce and thicken.

Adjust the heat, lowering it as needed and let it continue to reduce down and thicken. Scrape the sides with a spatula if needed.


A1 Sauce simmering on stove before canning in jars
A1 Sauce, HP Sauce – whatever you call it, it’s a delicious condiment for savory food.

Look at the color difference after a couple hours of simmering on the stove! It’s beginning to thicken nicely and it’s almost ready to taste!

After an hour, taste the sauce to see if it is to your liking. We found the taste changed quite a bit as it cooked down, so keep that in mind.

HP Sauce in half pint jars ready for canning

By the end of the afternoon, we had taste tested the sauce several times and enjoyed a nice glass of homemade Rhubarb wine! Once the sauce is reduced to the thick consistency you want, turn your stove down to Low and get out your canning jars for the next step!

Note: Only store in the fridge, enough jars that you will use up in 2 or 3 weeks. The rest of the HP Sauce needs to be water bath canned for safe preservation.

How to Can Homemade HP Sauce

I like to can this homemade brown sauce recipe in half pint mason jars. You can certainly use pint jars if you wish, (can for 20 minutes) and if you have a larger family, this might be your best bet.

This condiment will easily last 3 weeks in your fridge, once the jars are open. Ours never lasts that long because we use it so much!

Fill the water bath canner with enough water to completely submerge the jars. Turn this water on to boil and meanwhile, wash the canning jars and use tongs to set them inside the boiling water. Leave them there for 15 minutes to sterilize the jars.

Meanwhile, heat some water on the stove and add the canning seals. You don’t need to boil the water but make the water hot and leave the seals in the hot water until needed.

Filling Canning Jars

Remove the jars for filling. Use a canning funnel and a ladle to fill your jars. Canning funnels make a messy job a lot tidier. And this thick sticky sauce loves to stick to the jar rims! 

Leave a 1/4 inch of headspace in each jar. After filling, use a wet clean dishcloth or paper towel to wipe around the rim of each jar. If you don’t do this, and there is a bit of sauce on the rim, the canning lid will not be able to seal properly.

Wipe each rim, add your seal and screw on the ring finger tight. Your jars are ready to go into a boiling water bath for 10 minutes.

Once the hot water has come up to boil, set your timer. Process half-pint jars in a water bath canner for 10 minutes, depending on altitude.

Up to 1000 foot elevation, 10 minutes. Between 1001 – 3000 feet above sea level, add another 5 minutes. So I will be processing for 15 minutes, as we are at 2850 foot elevation level.


Add this HP Sauce recipe to your seasonal canning calendar!

Give this recipe a try; you may love it so much, you’ll never buy a1 sauce or any of those other steak sauces again!

Small jars of this sauce make a perfect gift for your favorite chef, too! Don’t have time to make a batch?

Here’s where you can buy the brand name HP Sauce  – made by HP Foods.

More Recipes for You

This home made Rhubarb Wine recipe is a great way to use a large rhubarb harvest.

Here’s the very BEST Salsa recipe around! Canning instructions too.

The perfect Pickled Beets are a treat on a pickle tray or included in your dinner recipes.

Want a sweet sauce? Here’s a Mango sauce you will want to try.

HP Sauce in a mason jar and a dish ready for brushing on meat.

Ultimate HP Sauce Recipe -Homemade Condiment

Yield: 15 half pint jars
Prep Time: 30 minutes
Cook Time: 3 hours
Additional Time: 10 minutes
Total Time: 3 hours 40 minutes

The perfect condiment for steaks, roasts and savory foods, HP Sauce is a traditional English favourite. Also known as A1 sauce or Brown Sauce.

Ingredients

  • 4 pounds apples, chopped
  • 4 pounds prune plums, chopped
  • 2 large onions, chopped
  • 3 pints malt vinegar
  • 1/4 cup Worcestershire sauce
  • 2 tsps ginger
  • 2 tsps nutmeg
  • 1 tsp cayenne powder
  • 2 tsps allspice
  • 1/2 cup salt
  • 4 cups sugar

Instructions

  1. Cut apples into pieces, removing the core.
  2. Cut prune plums into pieces, removing the pit.
  3. Chop onions.
  4. Put these ingredients into a large stockpot and add just enough water to prevent any scorching on bottom of pot. I used 2 cups water.
  5. Bring to a boil, then simmer until ingredients are soft.
  6. Use an immersion blender or potato masher to begin crushing the apples and plums.
  7. Once soft and cooked, press this through a sieve. Press hard to remove as much as possible. Press into a large cooking pot.
  8. Set aside the pulpy skins.
  9. To the sauce, add the vinegar, seasoning, sugar and Worcestershire sauce. Stir well.
  10. Bring to a boil, then reduce to a simmer. Let this mixture thicken (will take a couple of hours).
  11. Once thick, ladle into canning jars. Leave 1/2 inch headroom, add seal and ring.
  12. Water bath can the jars for 10 minutes (up to 1000 ft elevation). Above 1000 ft, boil jars for 15 minutes.
  13. Using canning tongs, remove jars and set on a thick towel on the counter. Leave alone for 24 hours.
  14. After the 24 hours, check each jar that it has sealed. Unsealed jars can be water bath canned again or placed in fridge to use within 3 weeks.

Notes

You can use half pint or pint jars for your Brown Sauce.

Nutrition Information:
Yield: 240 Serving Size: 1
Amount Per Serving: Calories: 63Total Fat: 0gSaturated Fat: 0gTrans Fat: 0gUnsaturated Fat: 0gCholesterol: 0mgSodium: 242mgCarbohydrates: 15gFiber: 1gSugar: 13gProtein: 1g

Did you make this recipe?

Please leave a comment on the blog or share a photo on Pinterest

© Annie
Cuisine: American

HP Brown Sauce in small jars


Originally published Aug, 2021; latest update Feb, 2026

Filed Under: Recipes

How to Roast Garlic

By Annie

Once you learn how to roast garlic cloves, you’ll be including this healthy side dish more often with your meals. Learn how to easily roast whole heads of garlic!

Roasted garlic tastes sweet and nutty and sends wonderful aromas throughout the kitchen. Garlic, as a cooking spice, is quite versatile and there are lots of delicious garlic recipes.

Fresh garlic cloves sit in a bowl.
Wondering how to roast garlic? Here are several ways to enjoy roasted garlic with your meals.

Why You’ll Love This Roasted Garlic Recipe

There are not many dishes or cuisines for which garlic is not a good complement either as a side dish, as an infusion or mixed into the meal.

For the best flavored garlic, learning how to roast fresh garlic cloves can give a subtle difference to the taste of a dish. Compared to dried powdered, salted garlic or minced garlic that is pre-prepared and purchased in a store?

Well, there really is no comparison – fresh roasted garlic cloves win! Hands down!

Roasted Garlic in a Saucepan and on tin foil.
If you’re searching for tips on how to roast garlic in the oven, be sure to read this post for all the information you could need!

It might come as a surprise how sweet and nutty freshly roasted garlic can taste compared to the mass-manufactured and pre-prepared garlic seasonings.

Roasted garlic complements most recipes or can be sautéed with onions, butter and a little brown sugar for a succulent side dish. Grate or chop into pasta, mix it in to your mashed potatoes for a super flavorful side dish, make a flavorful salad dressing, add to sauces or your favorite hummus, or use it to make homemade garlic bread!

Instructions

Heads of garlic can be roasted using a toaster oven, convection oven or conventional oven or on the grill, but garlic can also be roasted in a pan on a stovetop.

Roasting garlic is the best way to bring out the nutty sweetness and caramelized flavor that garlic is known for, instead of the pungent aroma often found with processed garlic.

In fact, garlic that is roasted doesn’t leave the bad breath scent for which garlic sometimes gets a bad rap, and there are many researched health benefits to consuming raw garlic or roasted fresh garlic.

How to Roast Garlic in the Oven

A bulb of freshly roasted garlic, still on the tinfoil it was cooked in after having the top chopped off and oil poured on.
  1. Peel the desired amount of garlic cloves or just cut off the pointed tops of a whole garlic bulb with a sharp knife to release the aroma and interior oils (just like that picture above). These pieces can be roasted whole or cut or chopped, and then placed inside foil. Leave the foil unsealed at the top.
  2. Drizzle the garlic with a couple of teaspoons of olive oil (or any favorite flavored oil) and add any complementary spices you like.
  3. Place the foil on a baking sheet in the center of the hot oven and bake at 350-375 degrees for 40 minutes, until the tops of the garlic are lightly browned but not burnt.

Roasting Garlic Cloves on the Stove

Roasting garlic cloves in a pan on the stove.
Slow roasting garlic cloves in a pan on the stove is another great way to prepare this treat!

Roasting garlic in a pan uses the same oil drizzle technique, except the garlic cloves cannot be unattended while roasting. Simply place the cloves in the pan, (we love Lodge cast iron – highly recommend) add a little butter, flavors and spices, and then drizzle the oil over the cloves.

  1. Turn the flame onto a low/medium-low heat, and use a metal spatula to constantly move the garlic.
  2. Once the garlic has softened, and this might take as much as 15-20 minutes of constantly stirring, the flame can be turned up higher and the cloves allowed to sizzle until lightly browned and slightly firm on the outside.

How to Roast Garlic in the Air Fryer

This method is similar to the oven method, but typically doesn’t take as long!

  1. Preheat air fryer to 375 degrees F.
  2. Gather individual cloves or chop the top off a whole bulb of garlic.
  3. Drizzle with olive oil and season as desired.
  4. Wrap well in a piece of aluminum foil and place in the air fryer.
  5. Air fry until soft and fragrant, about 16-20 minutes.

Which Spices Go Good with Garlic?

Any savory spice will work well, including:

  • rosemary
  • thyme
  • basil
  • sage
  • paprika
  • sea salt
  • pepper
Garlic Bulbs with tops cut off on parchment paper with spices and herbs
A variety of spices go great with garlic!

More Garlic FAQ

How to store roasted garlic?

Roasted garlic can be stored for up to a month in the refrigerator before it begins to lose its flavor. Just be sure to store in an air-tight container, plastic bag or jar.

A garlic bulb can also be infused into an oil and kept for longer.

How do I store garlic bulbs?

If bought fresh from grocers or farmers’ markets, garlic can be stored for several months in a cool and dry place in a pantry. We store our garlic in an open weave basket in the kitchen.

There is no reason to refrigerate garlic prior to roasting.

Can I grow garlic in containers?

Yes you sure can grow garlic in pots or containers! Here’s everything you need to know about how to grow garlic in the backyard!

Can I freeze roasted garlic for eating later?

Yup you can – here are several ways to preserve garlic by freezing.

How long to roast garlic?

Roasting time can depend on the size of your garlic cloves. It’s better to start out with a lower time, around 30 minutes, and add more time if needed.

Freshly peeled garlic on a brown cloth with wood spoon.
Freshly peeled garlic ready for roasting on the stove.

How to roast garlic without foil?

If you prefer, you can use parchment paper instead of foil for your roasted garlic cloves. Just be sure it isn’t wax paper, as that can melt in the oven and ruin your garlic!

How to remove garlic from skin?

Once roasted, it’s actually quite easy to remove each clove from the garlic skin. Give them some time to cool, then simply squeeze from one end and the individual cloves of garlic should should slide right out!

More Garlic Appetizer Recipes

Our entire Country Living in a Cariboo Valley Recipe Collection can be found here, and here are some more delicious garlic recipes hand-picked for you!

  • These Garlic and Bacon Wraps are the perfect appy side dish!
  • Feta and Garlic? Yes please! Try this Feta Cheese and Garlic Dip appetizer recipe.
  • Garlic Side Dishes for your family to enjoy.
  • This Garlic and Parmesan Asparagus makes a delicious side dish.

Now that you know how to roast garlic, add this roasted garlic recipe to more of your dinner recipes!

Roasting garlic in a cast iron pan

How to Roast Garlic with an Oil Drizzle

Yield: 2 bulbs
Prep Time: 5 minutes
Cook Time: 40 minutes
Total Time: 45 minutes

Once you learn how to roast garlic, you’ll be including this healthy side dish more often with your meals.

Ingredients

  • 2 garlic bulbs
  • oil (whichever kind you prefer)

Instructions

  1. Peel the desired amount of garlic cloves (or just slice off the tops) and place in foil. Leave the foil open at the top.
  2. Drizzle with oil.
  3. Place the foil on a baking sheet and bake at 350-375 degrees F for about 40 minutes.
Nutrition Information:
Yield: 2 Serving Size: 1
Amount Per Serving: Calories: 66Total Fat: 7gSaturated Fat: 0gTrans Fat: 0gUnsaturated Fat: 6gCholesterol: 0mgSodium: 1mgCarbohydrates: 1gFiber: 0gSugar: 0gProtein: 0g

Did you make this recipe?

Please leave a comment on the blog or share a photo on Pinterest

First Published March 2021; Updated November 2022


Filed Under: Food, Garlic, Recipes

Quick Pickled Pearl Onions Recipe for Canning or Fridge

By Annie

These easy and flavorful Pickled Pearl Onions are the perfect recipe for anybody who’s new to canning.

With just a couple of simple ingredients, you can have your own pickled onions to use in drinks, condiment trays, or cooking. Here’s a quick and easy pickling recipe.

Water bath canning is a great way to learn how to can and these quick pickled pearl onions just need a short processing time.


Pickled pearl onions that are red in a canning jar with rosemary and peppers.
Pickled Pearl Onions are great to use on a condiment tray, in cocktails or in salads.

Why You’ll Love this Pickled Onions Recipe

You can use either the small pearl onions or sliced regular size onions. And you can cut the recipe if half if you don’t want to can them and store the finished jars in your fridge. Or, make a full batch and then water bath can the jars so they can be safely put into your food storage.

Onions are really easy to grow, but if you don’t have a vegetable garden then just buy the onions instead. Sometimes you can find a great deal on pearl onions at the store, your local farmers market or at a farm store near by.

Onions are inexpensive and they are easy to store whole to use over winter. Here’s how we store onions all winter long. But if you like pickles and you like onions, whip up a batch of these pickled onions. 

Add them to meat based dishes, tacos or wraps and even in salads. Enjoy them with other pickles on a condiment tray. Or, just eat them right out of the jar.


Ingredients Needed

  • pearl onions – you’ll want to make sure they’re peeled before you pickle them.
  • pickling vinegar – this typically means your classic white vinegar, but apple cider vinegar can be used for a specific flavor addition if you don’t mind slight discoloration.
  • water
  • salt
  • sugar – helps offset some of the salt and acidity from the vinegar.
  • pickling spice – a perfect pre-made blend of spices that will result in a delicious pickled onion every time!


How to Make Pickled Pearl Onions

Lots of pearl onions on cutting board ready for preparing pickles.
Pearl onions are a delicious variety of onion that make for perfect pickling! They’re typically white, but gold and red onion exists in this size as well.
  1. We needed 8 cups of pearl onions, trimmed and cleaned, so we took off the loose papers and then dropped the onions into boiling water for 30 seconds.
  2. I used my mesh sifter to hold the onions so they were easier to deal with. From the hot water, they went straight into really cold water for about 30 seconds. This made the outer layer easier to slip off. That layer is fairly thick and tough so we didn’t want to pickle the onions with that layer on. It did take a bit to slip all the skins but you can see it’s worth it – those small onions look beautiful once they are ready for pickling. They are going to look so pretty once they are in jars.
  3. Slipping skins off pearl onions.
    Taking all of the skins off your onions can be slightly tedious, but so worth it for the finished product.
  4. Wash the jars and place them in a boiling water bath for at least 15 minutes to sterilize.
  5. Place your canning seals in a bowl and cover with hot water.
  6. Combine your vinegar, water, salt, and sugar in a medium saucepan and bring this mixture to a boil, then reduce to a simmer. Add the onions, simmer for about five minutes, bring it back up to a boil, then bring it down to a simmer for another 5 minutes.
  7. Add your pickling spice to the empty jars, then follow up with the onions and pickling liquid.
  8. Put on the seal and canning ring, then place the jars in the water bath canner and boil for 15 minutes. Remove them and allow them to sit for at least 24 hours.
Pearl onions ready for pickling.
These pearl onions have such a beautiful purple color, which makes them perfect to preserve.

Variations for Flavouring Pickled Onions

As long as you don’t change the measurements of vinegar or water, it is possibly to change up the flavour of these pickles. You may like to try adding a teaspoon or so of:

  • thyme leaves
  • mustard seed
  • celery seed
  • cloves
  • bay leaves
  • coriander seeds
  • black peppercorns
  • garlic cloves
  • hot peppers such as cayenne or jalapeno


Getting Mason Jars Ready for Canning

Canning for your first time can be a bit of an intimidating process, so here’s another breakdown for you.

While the onions were being prepared, we got the water bath canner full of water and set on the stove to boil. Make sure to have a bottom rack in the canner, so the mason jars do not sit directly on the canner.

Then, we set all the clean empty jars in the water bath canner and let it boil. After 15 minutes the jars are sterilized and they can be taken out. Also, we got the canning seals ready in a shallow bowl and covered with hot water.

They will sit in the water until the moment they go on the jars. We also got the pickling mixture going on the stove. This included vinegar, water and sugar. 

After the pickling solution came to a boil, we turned to the stove down to a simmer and cooked the onions about 5 minutes.

Small onions being heated for pickling.
The onions just soak up all of that pickling liquid, which means they’re absolutely packed with pungent flavor!

At this point, add the clean pearl onions to the pickling mixture and wait for it to come back to a boil. Once it boils, turn it down and let it all simmer for 5 minutes.

Filling the Canning Jars

Now, we’re ready to fill the jars. We’re canning these in half pint jars, but you can easily use pint jars if you like. The smaller jars get used a lot here, as we like to open a jar and then use it all up! 

Onions and some pickling spice on the counter.
These pickled onions are perfect for drinks, to pair with meat dishes, or to eat right out of the jar.

Sprinkle some pickling spice (or whichever spices and herbs you like) into each jar and then add the pearl onions. Then fill the jar with the warm pickling liquid (sometimes called brine) and leave 1-inch headspace. Be sure to remove any air bubbles as well.

Be sure to wipe rims of jars with a wet cloth. This helps remove any food or liquid on the rim – that will definitely interfere with the jar becoming properly sealed. Don’t skip this step.

Put your canning seal on top and add the ring. Tighten just to fingertip tight – don’t overtighten them.


Canning Pickled Pearl Onions

Using your jar lifter, add each jar to the boiling water in the water bath canner. Reminder: be sure you have a rack on the bottom of the canner, so there is a barrier between the bottom of canner and the bottom of the jars.

Try to not let the jars touch each other. I can usually get 7 jars in my boiling water canner; if I want to add more, I add another rack on top of the jars.

Then add more jars on top of the rack. Put the lid back on the canner and let the water come back to a boil.

A dish of pickled onions sits with a jar of pickled onions.
This pickled pearl onions recipe is simple to make and yields tasty results every time. Try it out, you won’t be disappointed!

The depth of your water bath canner will determine how many jars you can do at one time, on two levels.

Let the water boil and then set the timer for 15 minutes. Once done, remove the canning lid and use your jar lifter to carefully remove the hot jars.

Set the jars on the counter (put a thick towel down first) and be sure to leave space between each jar. Now leave the jars alone for 24 hours to seal and cool down. As they jars seal, they will make a pinging noise.

After the 24 hours, test each jar to ensure it is sealed. Are all the seals concave? If not, put the jar in the fridge and plan to use it up first or you can again put them in the water bath to see if they will seal.


FAQs

How to Store Pickled Pearl Onions

If you don’t want to bother water bath canning any jars of pickles, you can easily reduce the recipe to make fewer jars. Then, after the jars have been filled with the pickling mixture, wipe the rims and place the seals and lids on the jars.

Let them cool on the counter for at least 12 hours (24 is better) and then just store the jars in your fridge. They will last indefinitely in the fridge because of the pickling.

Remember: If you do NOT can them, keep them in the fridge at all times.

If you do water bath can them, you can add these to your food storage, whether that is in your pantry or cold room. Because they have been through the canning process, they will be safe stored at room temperature.

How to Serve Pickled Pearl Onions

They’re a great appetizer, or use them in cocktails. Put a couple of pickled onions on a toothpick and serve with a martini with gin and vermouth. This is sometimes also called a Gibson cocktail. And pickled onions work as a great garnish for a Bloody Mary!

You can also add them to pulled pork, burgers, or other sandwiches, tacos and salads.

I recommend you drain off some of the liquid before serving, or you could combine it with a bit of oil and use it as a salad dressing.

Can you eat pickled pearl onions out of the jar?

Of course! If you love the flavor of these pickled pearl onions, feel free to grab a fork or toothpick and eat them right out of the jar.

Are pickled pearl onions good for you?

Pickled onions are known to have antioxidants, and ingredients that are anti-inflammatory and that can help with heart health and blood sugar levels!

What is a good substitute for pearl onions?

You can make this recipe using chopped white onions, shallots, or even leeks.

Do pearl onions have another name?

Pearl onions are also sometimes referred to as white cocktail onions, but are also called button onions, baby onions, or silverskin onions in certain places (like the UK).

A opened jar of pickled onions sits on a counter.
Pickled Onions is an easy canning recipe that is made in a water bath.

More Preserving Recipes

Our entire Country Living in a Cariboo Valley Recipe Collection can be found here, and here are some more fantastic canning and preserving recipes hand-picked for you!

  • Check here for an entire collection of preserving recipes.
  • This Pickled Asparagus is another great and easy pickling recipe!
  • And for something a little more festive, check out this recipe to learn how to can your own Homemade Salsa.


Homemade Pickled Pearl Onions Recipe

The Bottom Line: these Pickled Pearl Onions are easy to make and are a great way to fill your pantry

If you enjoy this recipe, please be sure to rate it 5 stars below! And print this off or save it to your recipes folder!

a dish of pearl onions and some pickling spice on the counter

Quick Pickled Pearl Onions Recipe

Yield: 4 pints
Prep Time: 30 minutes
Cook Time: 15 minutes
Total Time: 45 minutes

These quick and easy Pickled Onions are perfect for a condiment tray or used in cooking. Add to meat dishes, in tacos or in any tomato dish.

Ingredients

  • 8 cups peeled pearl onions (typically 10-12 oz)
  • 5 1/2 cups pickling vinegar
  • 1 cup water
  • 2 tsp salt (optional)
  • 2 cups sugar
  • 8 tsp pickling spice

Instructions

  1. Prepare jars for canning by washing them and then setting in a boiling water bath for 15 minutes to sterilize.
  2. Place canning seals in a shallow bowl; cover with hot water. Replace water as needed, if water cools too much.
  3. Put a large pot water on to boil.
  4. Prepare onions by removing loose wrappers. Then set in a colander and place into simmering water for 5 minutes.
  5. Plunge onions into cold water and then peel. Measure out 8 cups onion.
  6. Combine vinegar, water, salt and sugar and bring to a boil. Reduce to a simmer.
  7. Add spices to empty jars.
  8. Add pickles to the jars, put on the seal and canning ring (fingertip tight)
  9. Place jars in the water bath canner, bring to a boil and let boil for 15 minutes.
  10. Remove canning jars and place on the counter where they can stay for 24 hours without being moved.
Nutrition Information:
Yield: 16 Serving Size: 6
Amount Per Serving: Calories: 138Total Fat: 0gSaturated Fat: 0gTrans Fat: 0gUnsaturated Fat: 0gCholesterol: 0mgSodium: 294mgCarbohydrates: 34gFiber: 1gSugar: 29gProtein: 1g

Did you make this recipe?

Please leave a comment on the blog or share a photo on Pinterest

Category: Recipes

First Published October 2020; Updated October 2023


Filed Under: Canning, Recipes

  • « Previous Page
  • 1
  • 2
  • 3
  • 4
  • 5
  • 6
  • …
  • 11
  • Next Page »

Connect With Us!

  • Email
  • Facebook
  • Instagram
  • Pinterest
  • Twitter

Search this site

Generic selectors
Exact matches only
Search in title
Search in content
Post Type Selectors
Search in posts
Search in pages

Our Most Popular Posts

Garlic cloves in oil

How to Preserve Garlic in Oil – and Other Ways to Store Garlic

a open jar of pickled brussel sprouts on a counter

Easy Pickled Brussels Sprouts Recipe (Water Bath Canning)

Privacy Policy

Read about our Privacy Policy

Disclosure

Please note that some of this site’s links are affiliate links, and CountryLivinginaCaribooValley.com is a participant in the Amazon Services LLC Associates Program, an affiliate advertising program designed to provide a means for us to earn fees by linking to Amazon.com and affiliated sites. At NO ADDITIONAL COST TO YOU, I will earn a small commission, if you purchase them. I recommend them as they are good products.

Theme Design By Studio Mommy · Copyright © 2026